How to Create Unity Menu Elements Easily!

I’ve found populating a list with similar, but dynamically changing elements in unity is a relatively frequent challenge. Especially in mobile game development. I did a few idle/incremental games and they have many of these kinds of menus for upgrading player stats or even the premium/shop menus. For example, you want a list of items the player can buy. There will be 10+ items in a list, and each of those items does something slightly else. Maybe one item is really different.
| Example of such a list elements |
|---|
| Enabled if Player has 100+ gold, on click, removes 100 gold and adds +1 to damage |
| Enabled if Player has 200+ gold, on click, removes 200 gold and adds +1 to health |
| Enabled if Player has 150+ gold, on click, removes 150 gold and adds +1 to magic |
| Enabled if Player has 50+ gem, on click, removes 50 gem and adds +1 to gold find |
What if these items have interconnection, so they are dependent on each other? The design quickly becomes an unmanageable nightmare.

Possible Solutions
We can write separate codes for all of the menu elements. They are different, so they might have their own controllers right? Wrong. This will quickly become redundant. What about creating a generic MenuItemController which can fulfill all of the needs and based on an enum you can have a big switch inside how the controller will behave? This neither seems good.
My Proposal
Let me show you, how I usually tackle this.
First of all, here is the high-level setup. I usually create a MonoBehaviour somewhere on the menu container (a LayoutGroup), I call this something like MenuController. This Controller is responsible for populating the menu upon creation. In order to do this, the Controller needs a field, where we can put an instance of the menu elements we will instantiate. This is a new Controller we should create, let’s call it MenuItemController and leave it empty for now. So the MenuController should look something like this:
public class MenuController : MonoBehaviour
{
    // Transform of the LayoutGroup. Maybe it's in a child GO
    public Transform elementsParent;
    // Template of element. Be careful to always use Asset object here!
    public MenuItemController shopMenuElementTemplate;
    private void Start(){
        // In order to instantiate, do somthing like:
        GameObject.Instantiate(shopMenuElementTemplate, elementsParent);
    }
}
Now it’s time to do the neat part, the MenuItemController!
The trick here is you can have an initialization method on the elements where you can set some dynamic parameters with C# Actions and Functions. Basically, instead of passing actual values or models, you pass methods in the parameters. Worry not! It’s easier than it sounds! Let’s see a basic example:
using System;
using System.Collections;
using TMPro;
using UnityEngine;
using UnityEngine.UI;

public class MenuItemController : MonoBehaviour
{
    public TextMeshProUGUI Title;
    public TextMeshProUGUI Description;
    public Button Button;
    public TextMeshProUGUI ButtonText;

	private Action<MenuItemController> _onUpdate;

	private void Start()
	{
		// This is the loop, which keeps the
		// model updated. This can be moved to
		// OnUpdate if light enough.
		StartCoroutine(OnModelUpdate());
	}

	public void Initialize(
        Action<MenuItemController> onUpdate = null,
        Action<MenuItemController> onInitialize = null)
	{
		_onUpdate = onUpdate;
		// Set the buttons in OnInitialize lambda
		onInitialize?.Invoke(this);
	}

	private IEnumerator OnModelUpdate()
	{
		while (true)
		{
			// Update the model every .1s
			_onUpdate?.Invoke(this);
			yield return new WaitForSeconds(.1f);
		}
	}

}
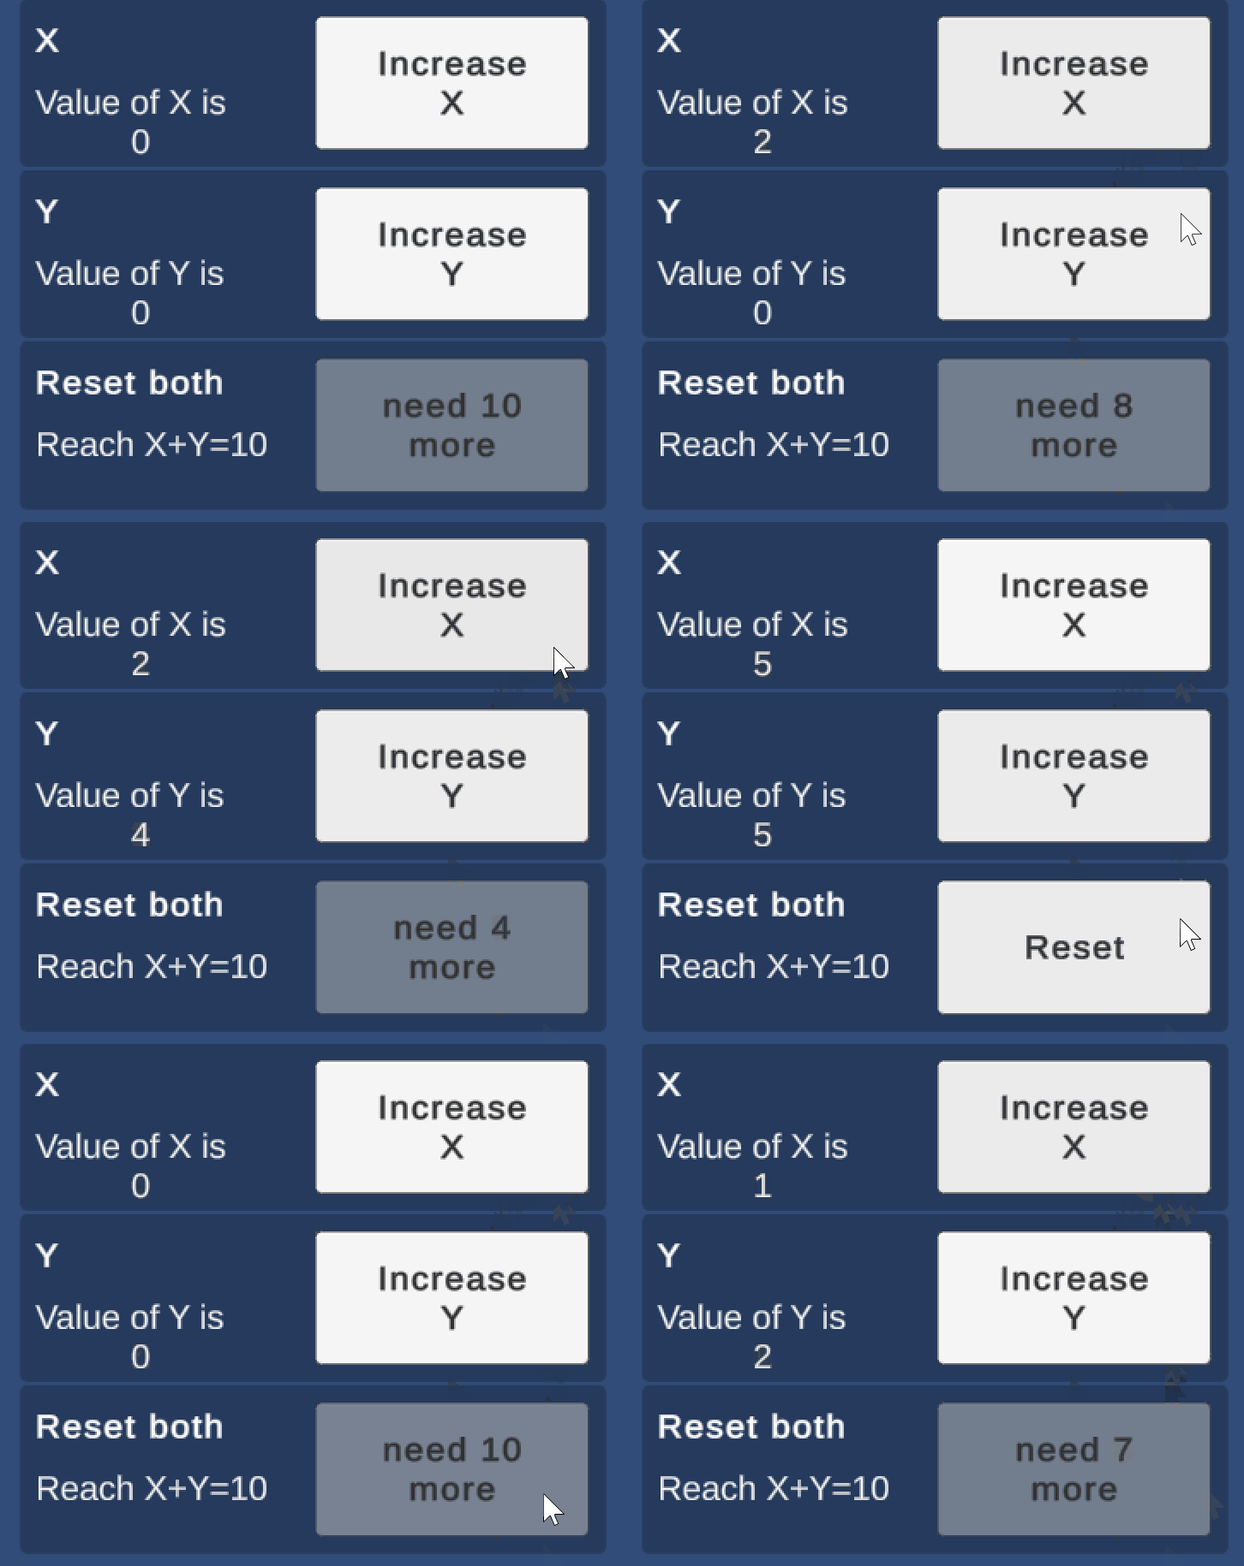
With this setup, now we can set some dynamically changing values to elements and do all sorts of magic. It’s easier to control states for a list of elements, straight from the controller that instantiates them. One place. One file. Let’s initialize a few!
using System.Collections;
using System.Collections.Generic;
using UnityEngine;

public class MenuController : MonoBehaviour
{
	// Careful here, pick asset only!
	public MenuItemController MenuItemTemplate;
	public Transform MenuItemsParent;
	private int _x = 0;
	private int _y = 0;
	private void Start()
	{
		// Clear menu parent.
		var children = new List<GameObject>();
		foreach (Transform child in MenuItemsParent) children.Add(child.gameObject);
		children.ForEach(child => GameObject.Destroy(child));

		// Initialize dynamic menu elements.
		// Easily
		// At One place, 100% controlled.

		//OnInitialize run once. Useful for button callbacks and constants
		Instantiate(MenuItemTemplate, MenuItemsParent).Initialize(
			onInitialize: model =>
			{
				model.ButtonText.text = "Increase\nX";
				model.Button.onClick.AddListener(() => _x++);
			},
			onUpdate: model =>
			{
				model.Title.text = "X";
				model.Description.text = $"Value of X is\n\t{_x}";
			}
			);
		Instantiate(MenuItemTemplate, MenuItemsParent).Initialize(
			onInitialize: model =>
			{
				model.ButtonText.text = "Increase\nY";
				model.Button.onClick.AddListener(() => _y++);
			},
			onUpdate: model =>
			{
				model.Title.text = "Y";
				model.Description.text = $"Value of Y is\n\t{_y}";
			}
			);

		Instantiate(MenuItemTemplate, MenuItemsParent).Initialize(
			onInitialize: model =>
			{
				model.Button.onClick.AddListener(() => {
					_x = 0;
					_y = 0;
				});
			},
			onUpdate: model =>
			{
				model.Title.text = "Reset both";
				model.Description.text = $"Reach X+Y=10";
				model.ButtonText.text = _x + _y < 10 ? $"need {10 - (_x + _y)}\nmore" : "Reset";
				model.Button.interactable = _x + _y >= 10;
			}
			);
	}
}
Benefits of Using This Kind of Menu
This is a nice example of how we can utilize advanced C# concepts in dave development. This setup lightens the MenuItems, so the logic can stay neatly in the menu parent controller. As I experienced it’s great to have everything in one place. It fits perfectly with the game’s menu. If there is a heavy repetition like in the post’s early example, you can create a factory for these lambdas as well, to make these menu initializations even smaller.


